
Every time a visitor interacts with your estimate widget — picks a service, fills in their home details, sees a price, clicks “Book Now” — that’s a trackable signal. Estimatty captures all of it and sends it directly to your ad platforms, no code changes required.
This means your Google Ads, Meta Pixel, TikTok, or GA4 account can see exactly which visitors became leads, which ones booked, and which ones bounced. That data is what separates cleaning companies running profitable ads from ones burning money guessing.
This guide walks you through enabling tracking, connecting your platforms, and understanding the events Estimatty fires.
Before You Start
Make sure you have at least one of the following ready:
- Your Google Tag Manager Container ID (format:
GTM-XXXXXXX) — found in GTM under Admin → Container Settings - Your Meta Pixel ID — found in Meta Events Manager → Data Sources → Your Pixel → Settings
- Your Google Ads Conversion Tag ID, Google Analytics 4 Measurement ID, TikTok Pixel ID, or other platform ID
You don’t need all of them. Connect only the platforms you’re actively using.
Step 1: Navigate to Tracking & Integrations
In your Estimatty dashboard, go to Marketing → Tracking in the left sidebar. This section is labeled NEW, so if you haven’t visited it yet, now’s the time.
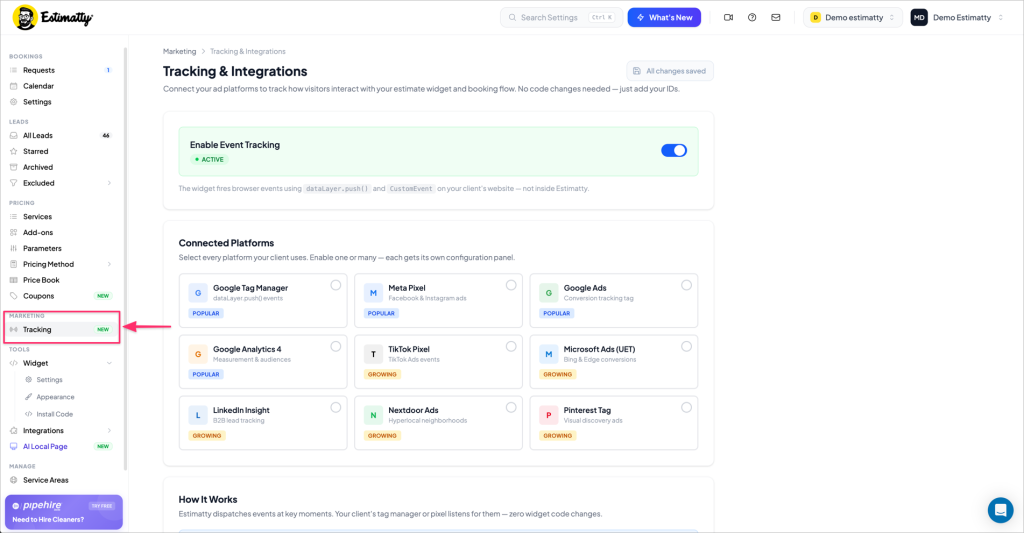
Step 2: Enable Event Tracking
At the top of the page, you’ll see the Enable Event Tracking toggle. Make sure it shows ACTIVE.
When this is on, Estimatty fires browser events using dataLayer.push() and CustomEvent directly on your website — not inside Estimatty. This means your tag manager or pixel picks them up automatically, exactly the way it would pick up any other event on your site.
If this toggle is off, no events will fire — even if your platforms are connected. Always verify it’s active after any changes.
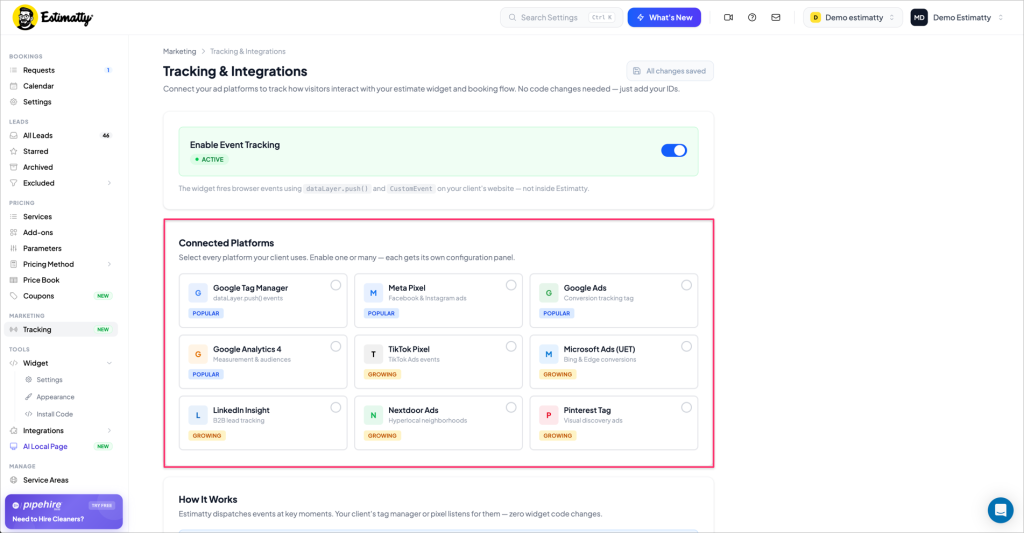
Step 3: Select Your Connected Platforms
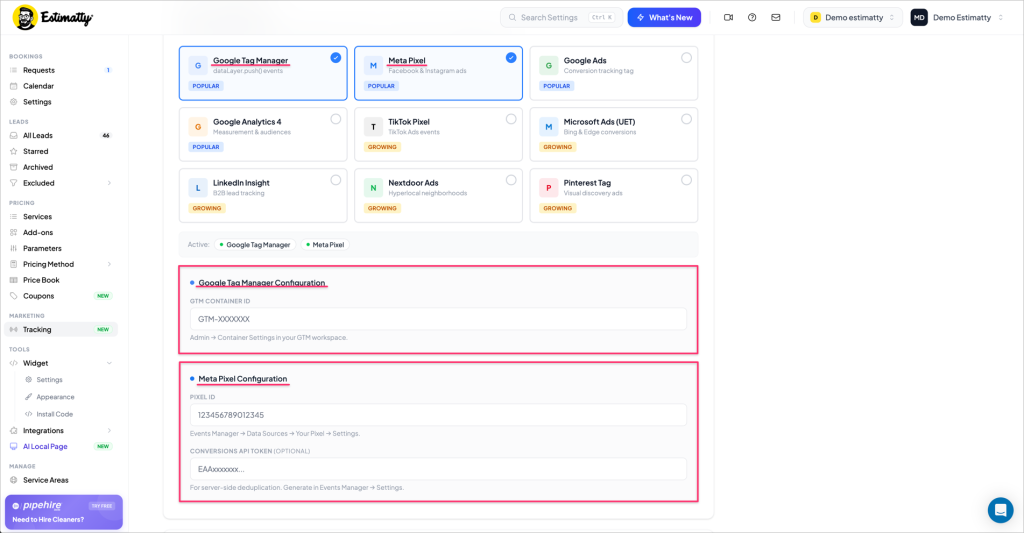
Below the main toggle, you’ll see the Connected Platforms grid. Estimatty currently supports nine platforms:
Most popular (recommended starting points):
- Google Tag Manager — the most flexible option; routes events to GA4, Google Ads, and more from a single container
- Meta Pixel — Facebook & Instagram ad tracking
- Google Ads — conversion tracking tag
Also available:
- Google Analytics 4 — measurement & audiences
- TikTok Pixel — TikTok Ads events
- Microsoft Ads (UET) — Bing & Edge conversions
- LinkedIn Insight — B2B lead tracking
- Nextdoor Ads — hyperlocal neighborhood targeting
- Pinterest Tag — visual discovery ads
You can enable one platform or many — each gets its own configuration panel.
Step 4: Configure Your Platforms
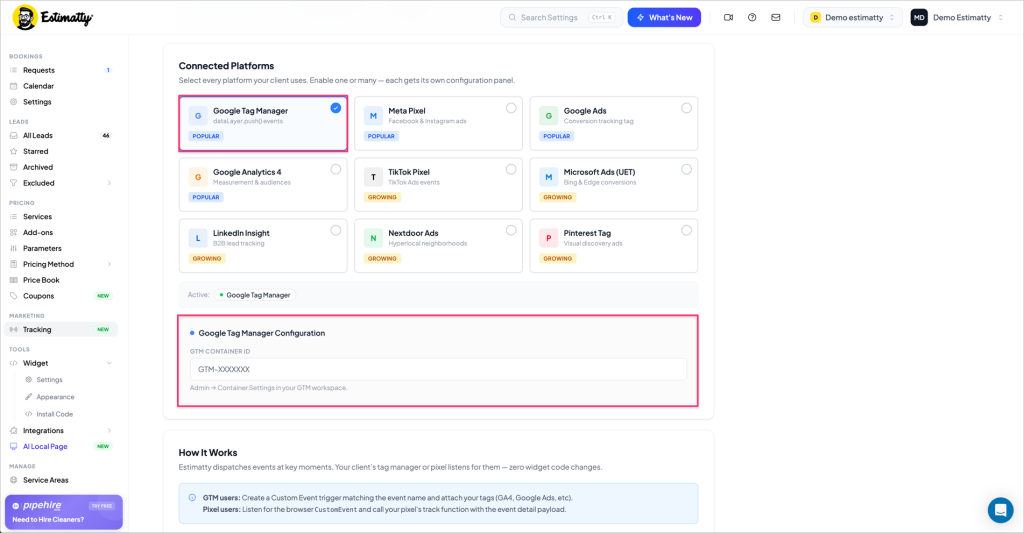
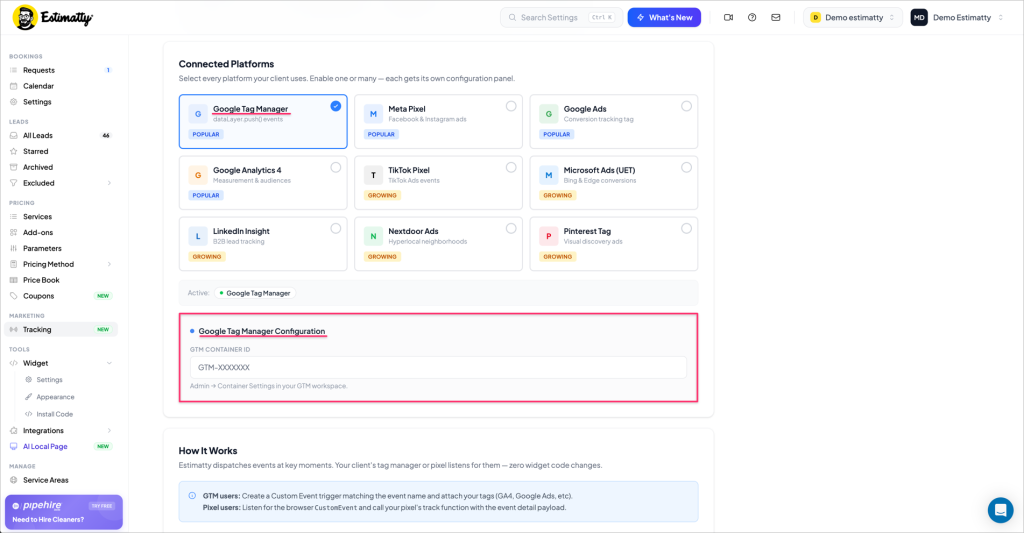
Click any platform card to select it. A blue checkmark appears and a configuration panel opens below the grid. The Active indicator at the bottom of the grid shows which platforms are currently enabled.
Google Tag Manager
Click the Google Tag Manager card. The configuration panel asks for your GTM Container ID.
- Find your Container ID in GTM under Admin → Container Settings
- It will look like
GTM-XXXXXXX - Paste it into the field and save
After connecting GTM, go into your GTM workspace and create a Custom Event trigger matching each event name you want to capture (see the Events section below). Then attach your GA4, Google Ads, or other tags to those triggers.
Meta Pixel
Click the Meta Pixel card. The configuration panel asks for:
- Pixel ID — your numeric Meta Pixel ID (found in Meta Events Manager → Data Sources → Your Pixel → Settings)
- Conversions API Token (Optional) — for server-side deduplication. Generate this in Events Manager → Settings. This improves tracking accuracy, especially with iOS privacy restrictions.
After connecting Meta Pixel, listen for the browser CustomEvent in your pixel setup and call your pixel’s track function with the event detail payload.
Connecting Multiple Platforms at Once
You’re not limited to one. Select as many platforms as you use — each gets its own configuration panel stacked below the grid. The Active indicator will show all enabled platforms side by side.
Step 5: Review and Configure Your Events
Scroll down past the Connected Platforms section to find the Events panel. This is where you control exactly which customer actions generate tracking data.
Every event here is a named signal Estimatty sends to your connected platforms. You can toggle each one individually — disabled events won’t generate data for any platform.
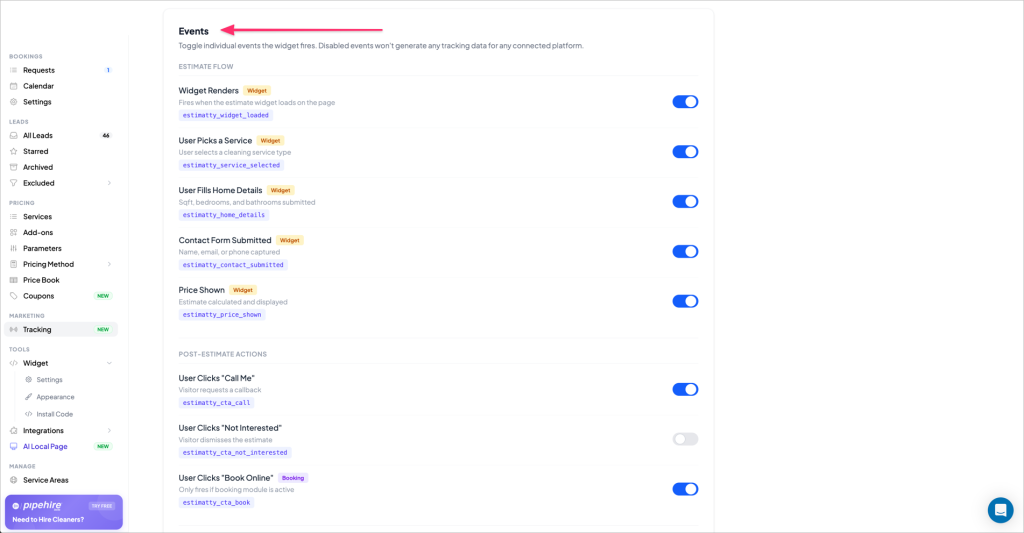
Estimate Flow Events
These fires as the customer moves through your estimate widget:
| Event Name | When It Fires | Event Code |
|---|---|---|
| Widget Renders | The estimate widget loads on the page | estimatty_widget_loaded |
| User Picks a Service | Customer selects a cleaning service type | estimatty_service_selected |
| User Fills Home Details | Sqft, bedrooms, and bathrooms submitted | estimatty_home_details |
| Contact Form Submitted | Name, email, or phone captured | estimatty_contact_submitted |
| Price Shown | Estimate calculated and displayed | estimatty_price_shown |
Contact Form Submitted and Price Shown are your highest-value events for ad optimization. These are the moments that prove a real lead was captured. If you’re running Google Ads or Meta campaigns, mark one of these as your primary conversion event.
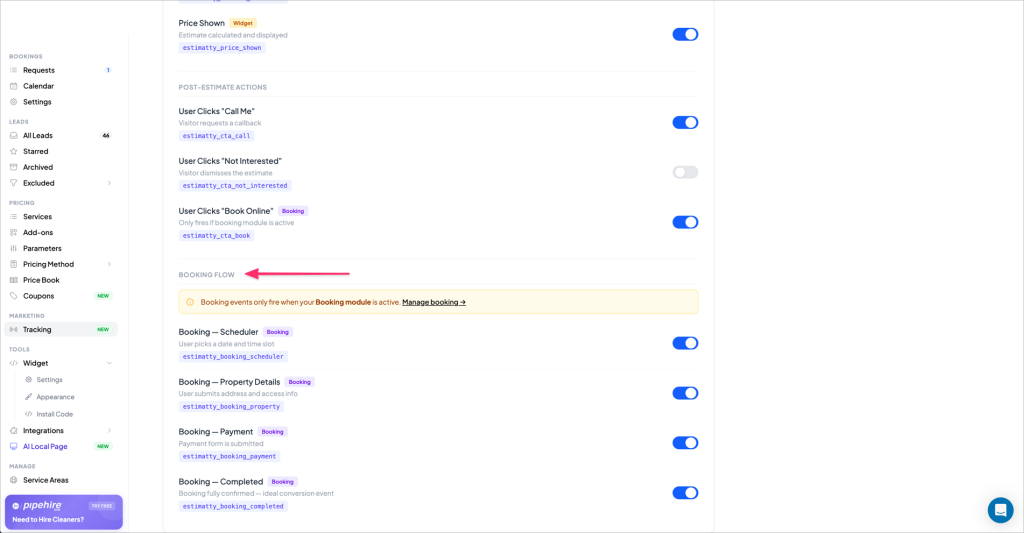
Post-Estimate Actions
These fires based on what the customer does after seeing their estimate:
| Event Name | When It Fires | Event Code |
|---|---|---|
| User Clicks “Call Me” | Visitor requests a callback | estimatty_cta_call |
| User Clicks “Not Interested” | Visitor dismisses the estimate | estimatty_cta_not_interested |
| User Clicks “Book Online” | Visitor taps the book button (Booking module must be active) | estimatty_cta_book |
“Not Interested” is toggled off by default. Consider turning it on, it lets you build retargeting audiences of people who saw a price but didn’t book, which is one of the warmest possible ad audiences.
Booking Flow Events
These fire only when your Estimatty Booking module is active. They track the customer’s journey all the way through to a completed booking.
| Event Name | When It Fires | Event Code |
|---|---|---|
| Booking — Scheduler | Customer picks a date and time slot | estimatty_booking_scheduler |
| Booking — Property Details | Customer submits address and access info | estimatty_booking_property |
| Booking — Payment | Payment form is submitted | estimatty_booking_payment |
| Booking — Completed | Booking fully confirmed (ideal conversion event) | estimatty_booking_completed |
Booking — Completed is your most powerful conversion event for ad optimization. If you’re running any paid traffic, this is the signal you want your algorithm optimizing toward — it represents real revenue, not just intent.
How It All Works Together
Estimatty dispatches events at key moments. Your tag manager or pixel listens for them on the client’s website — zero widget code changes required on your end.
If you’re using Google Tag Manager: Create a Custom Event trigger in GTM that matches the event name (e.g., estimatty_price_shown). Attach your GA4, Google Ads, or other tags to that trigger. GTM handles the routing.
If you’re using a direct pixel (Meta, TikTok, etc.): Listen for the browser CustomEvent and call your pixel’s track function with the event detail payload.
Not sure which setup is right for you? Google Tag Manager is the recommended starting point for most cleaning businesses. It gives you the flexibility to connect multiple platforms from one place, and you only need to enter one ID in Estimatty.
Quick Setup Checklist
Before you call this done, run through these:
- Enable Event Tracking toggle is ON and shows ACTIVE
- At least one platform is selected and configured with a valid ID
- Your GTM trigger (or pixel listener) is set up to receive the events
- Contact Form Submitted or Price Shown is designated as your conversion event in your ad platform
- If you’re using booking: Booking — Completed is set as a conversion in your ad platform
- Save all changes
Troubleshooting
Events aren’t showing up in my ad platform. First, confirm the Enable Event Tracking toggle is ON. Then verify the platform ID you entered is correct (no extra spaces). If you’re using GTM, check that your Custom Event trigger is configured with the exact event name string.
I can see events firing but they’re not being attributed to my ads. Make sure your conversion events are configured in your ad platform (Google Ads conversion actions, Meta custom conversions) and that you’ve selected the right Estimatty event as the trigger.
I enabled “Not Interested” but nothing is coming through. Confirm the toggle is saved. Then test by running through the widget yourself and clicking the Not Interested option to trigger the event.
Questions? Reach out at support@estimatty.com.