
Your widget is the engine that turns website visitors into paying leads.
Before you install it, you’ll spend a few minutes configuring it — choosing your mode, customizing the flow, and connecting your notifications.
The whole process takes less than 15 minutes, and the result is a 24/7 estimating agent that works while you sleep.
This guide covers everything in order: configure first, install second.
Before You Start
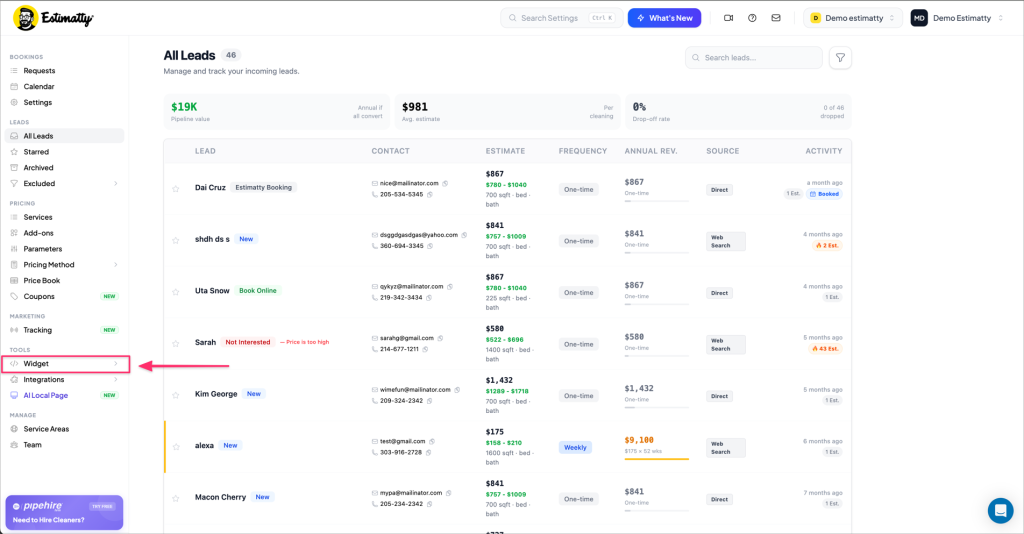
Log in to your Estimatty account at app.estimatty.com. In the left sidebar, navigate to Tools → Widget. You’ll find two sub-sections:
- Settings — configure your widget’s flow and behavior
- Appearance — match it to your brand colors and style
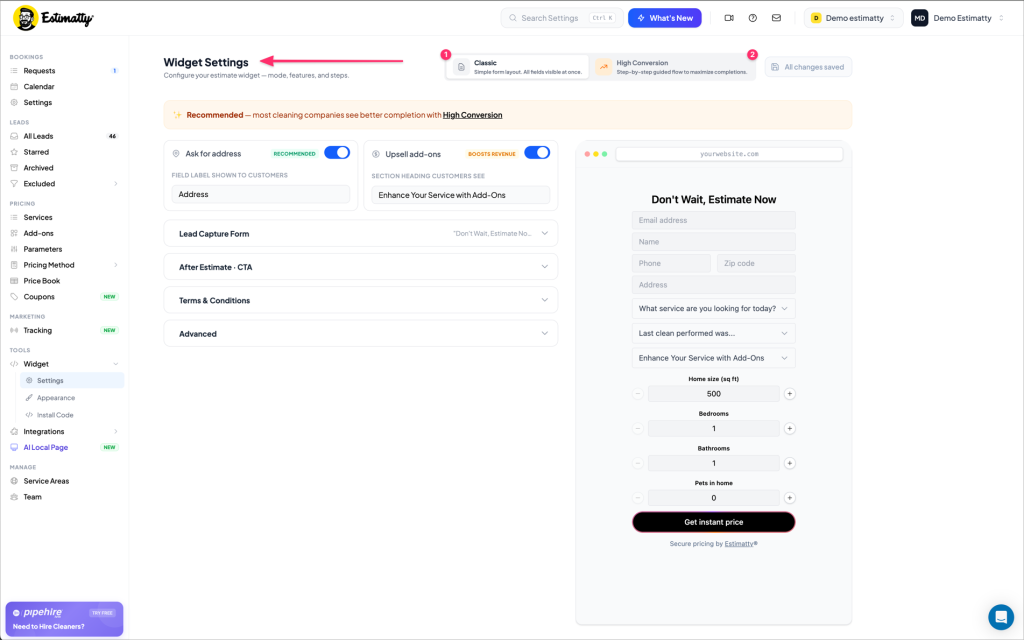
Step 1: Choose Your Widget Mode
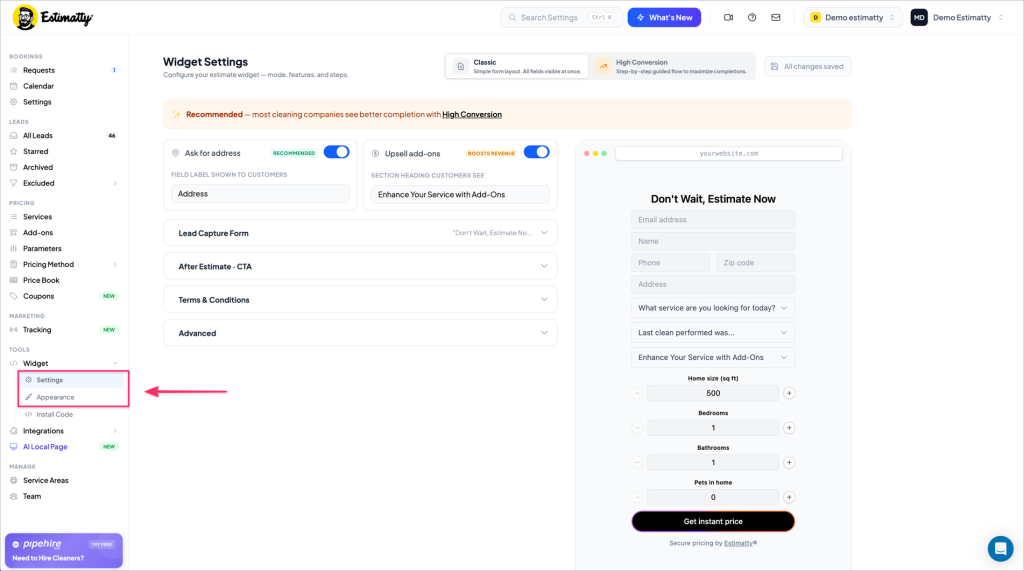
At the top of the Widget Settings page, you’ll see two modes:
Classic — A single-page form with all fields visible at once. Simple and fast to set up.
High Conversion (Recommended) — A step-by-step guided flow that walks your customer through the estimate one question at a time. Designed to maximize completions.
Our recommendation:
Switch to High Conversion.
The guided flow feels less overwhelming to homeowners and consistently results in more estimates completed.

Step 2: Configure Your Widget Settings
Work through the sections top to bottom. The sections available depend on the mode you selected.
Ask for Address & Upsell Add-ons
Two global toggles apply to both Classic and High Conversion modes:
- Ask for Address (Recommended) — Collects the customer’s address as part of the request. Useful for qualifying leads and checking service areas.
- Upsell Add-ons (Boosts Revenue) — Presents your add-on services before the customer submits. Easy extra revenue, zero extra effort.
Leave both on unless you have a specific reason to turn them off.
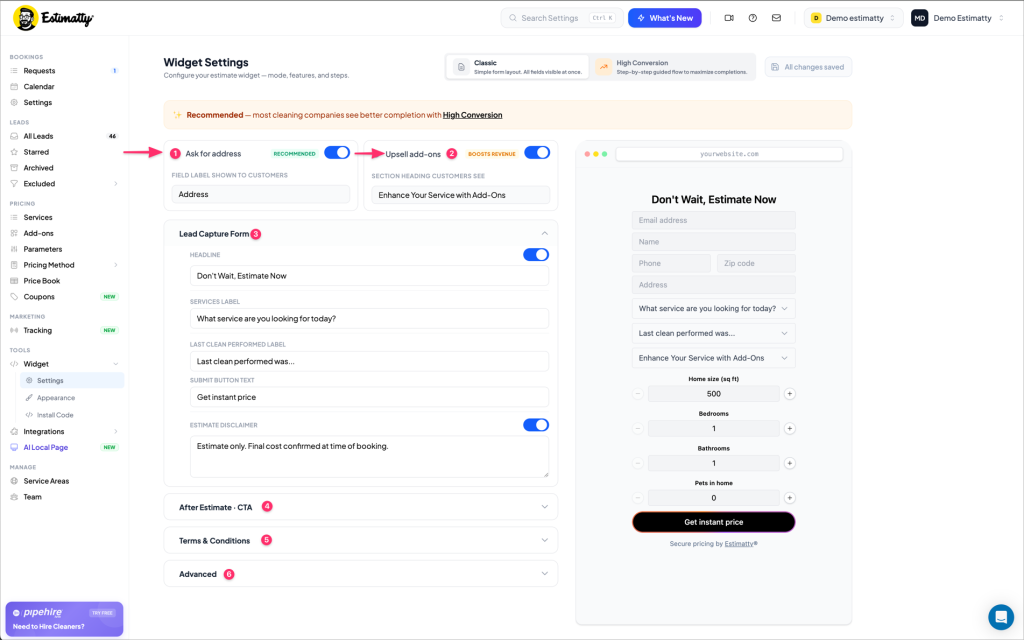
Lead Capture Form (Classic mode only)
Customize every text label your customers see before submitting:
- Headline — default: “Don’t Wait, Estimate Now”
- Services Label — the dropdown prompt for service type
- Submit Button Text — default: “Get instant price”
- Estimate Disclaimer — shown below the price (default: “Estimate only. Final cost confirmed at time of booking.”)
The headline and submit button text
are the two highest-impact fields.
Make them yours.
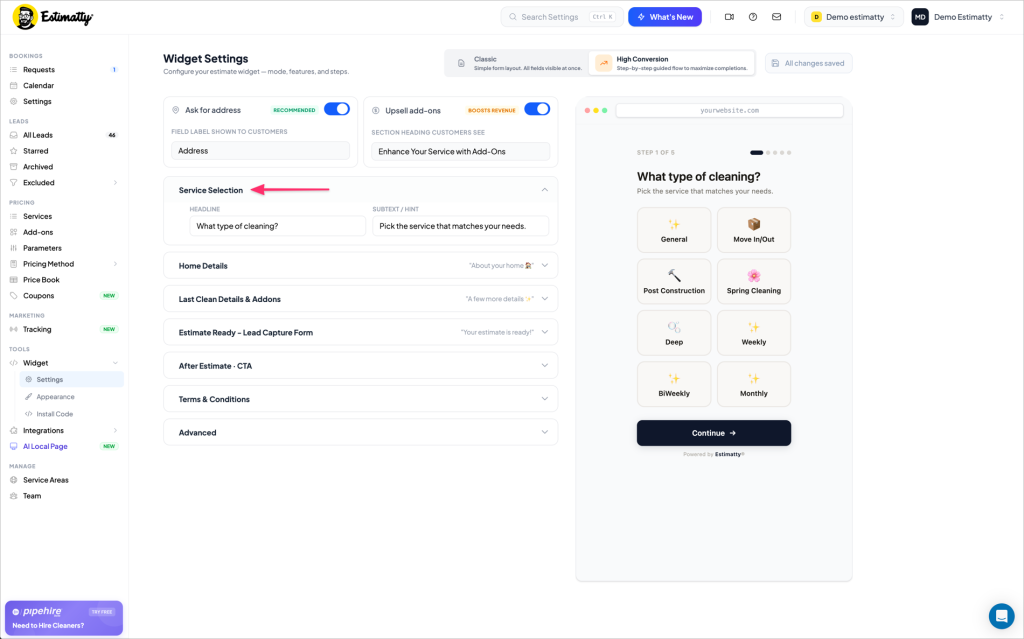
Service Selection (High Conversion — Step 1 of 5)
In High Conversion mode, your customer’s first screen is a visual card grid showing your available cleaning services.
Customize:
- Headline — default: “What type of cleaning?”
- Subtext / Hint — default: “Pick the service that matches your needs.”
Home Details (High Conversion — Step 2 of 5)
Step 2 collects home size, bedrooms, bathrooms, and pets using tap controls and sliders — no typing required from your customer.
Customize:
- Headline — default: “About your home “
- Subtext / Hint — default: “Slide and tap — no typing needed.”
That subtext is doing real work — it removes the customer’s “ugh, a form” hesitation before they even see the sliders.
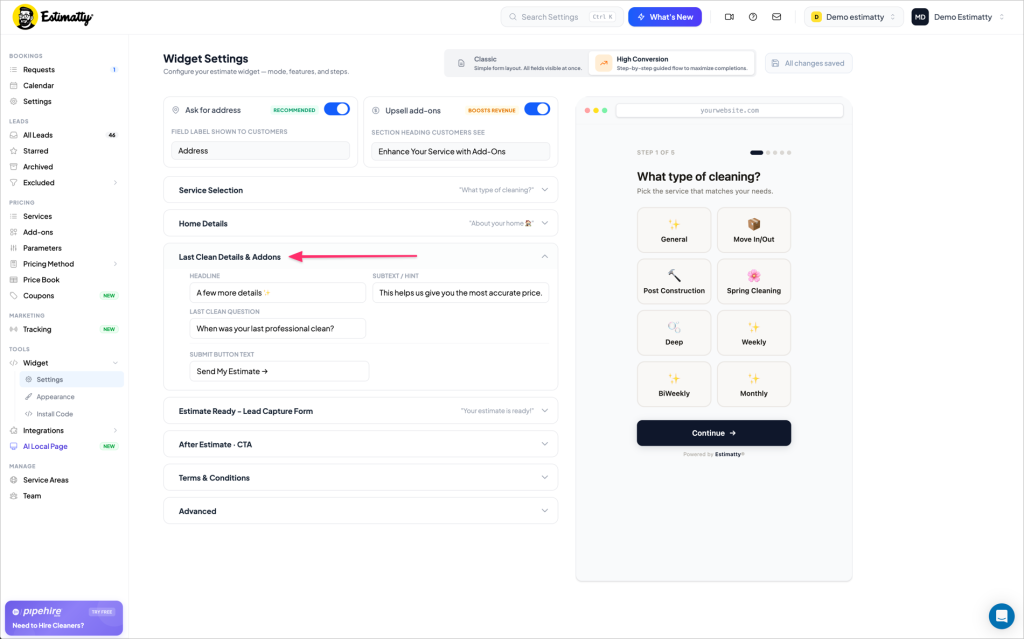
Last Clean Details & Add-ons (High Conversion — Step 3 of 5)
Step 3 asks about the customer’s last professional clean. This is how Estimatty calculates the right price tier. Add-ons are also presented here if that toggle is enabled.
Customize:
- Headline — default: “A few more details ✨”
- Subtext / Hint — default: “This helps us give you the most accurate price.”
- Last Clean Question — default: “When was your last professional clean?”
- Submit Button Text — default: “Send My Estimate →”
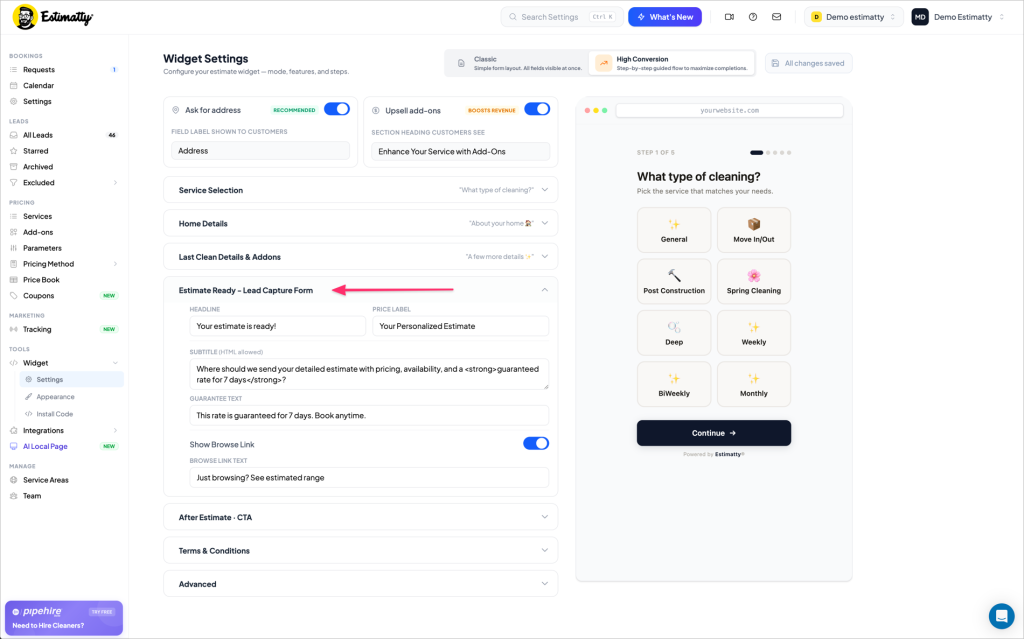
Estimate Ready – Lead Capture Form (High Conversion — Step 4 of 5)
The moment of truth: the screen where the customer sees their price and enters their contact info.
Customize:
- Headline — default: “Your estimate is ready!”
- Price Label — default: “Your Personalized Estimate”
- Subtitle — HTML supported. Default: “Where should we send your detailed estimate with pricing, availability, and a guaranteed rate for 7 days?”
- Guarantee Text — default: “This rate is guaranteed for 7 days. Book anytime.”
- Browse Link — optional “Just browsing? See estimated range” link for customers who aren’t ready to share contact info yet
The 7-day guarantee language is intentional. It reduces hesitation at the exact moment customers are most likely to bounce.
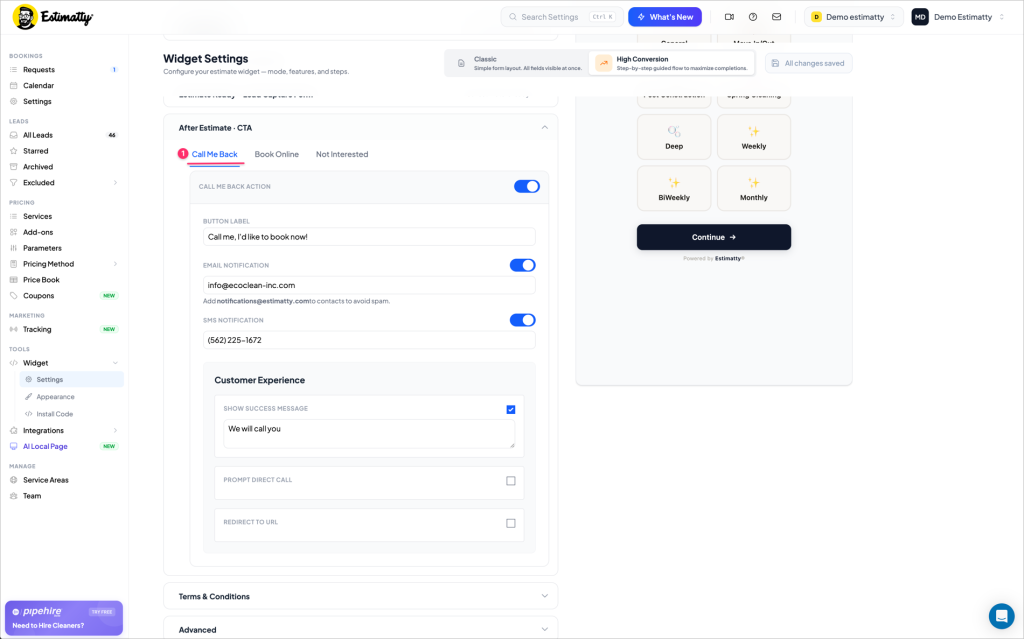
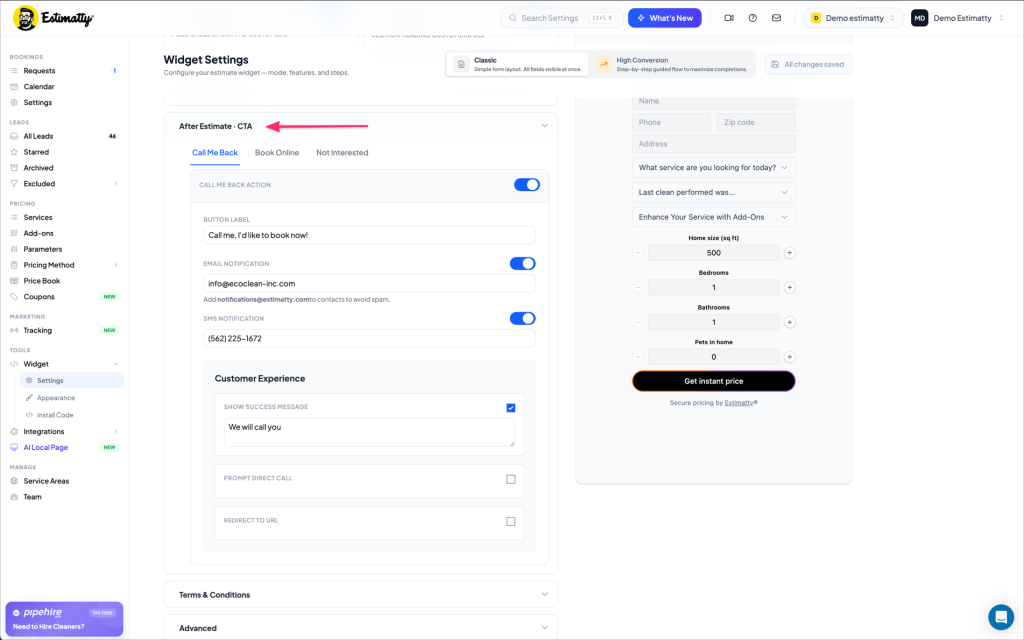
After Estimate · CTA (Step 5 of 5)
Configure what happens after a customer sees their estimate. There are three tabs — set all three.
Call Me Back
The customer requests a callback.
- Button Label — default: “Call me, I’d like to book now!”
- Email Notification — your email address for lead alerts
- SMS Notification — your phone number for instant text alerts
- Success Message — what the customer sees after submitting (default: “We will call you”)
⚠️ Add
notifications@estimatty.comto your contacts to keep lead emails out of spam.
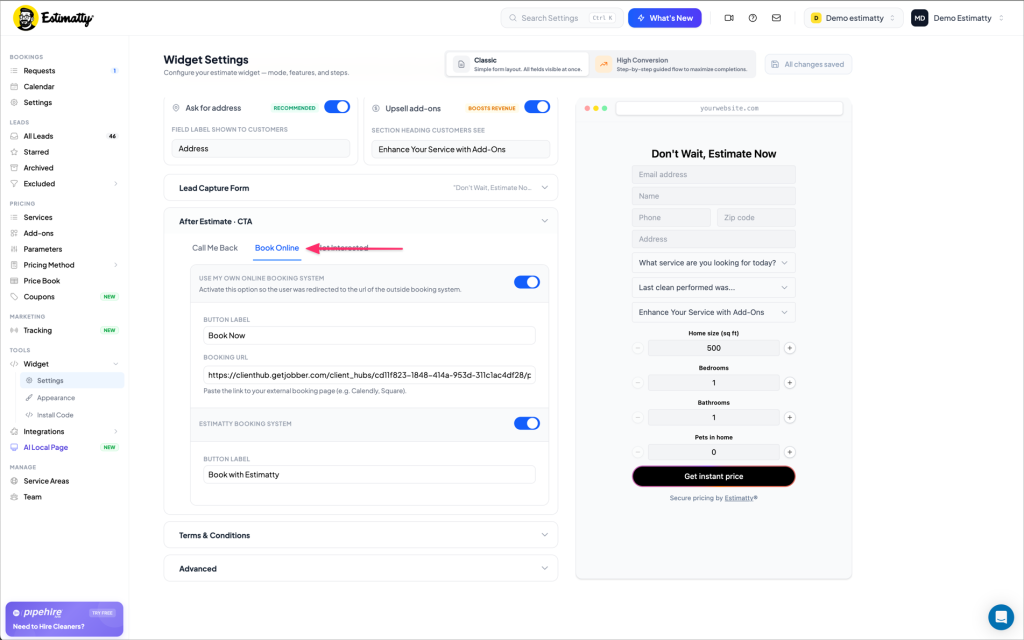
Book Online
The customer books directly without waiting for a callback. Two options:
- Use My Own Online Booking System — paste your external booking URL (Jobber, Calendly, Square, etc.)
- Estimatty Booking System — use Estimatty’s built-in booking flow
Both can be active at the same time, giving customers two paths to commit.
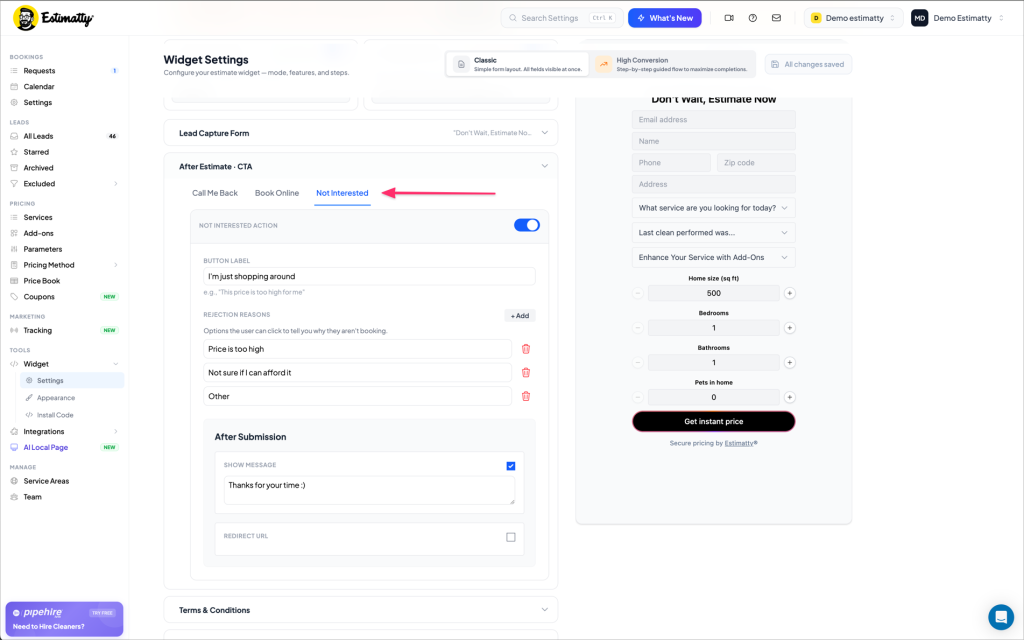
Not Interested
The customer isn’t ready to book. This tab captures why.
- Button Label — default: “I’m just shopping around”
- Rejection Reasons — optional reasons customers can select (Price is too high, Not sure if I can afford it, Other). Over time, this data tells you exactly where leads are falling off.
- After Submission Message — what they see after (default: “Thanks for your time :)”)
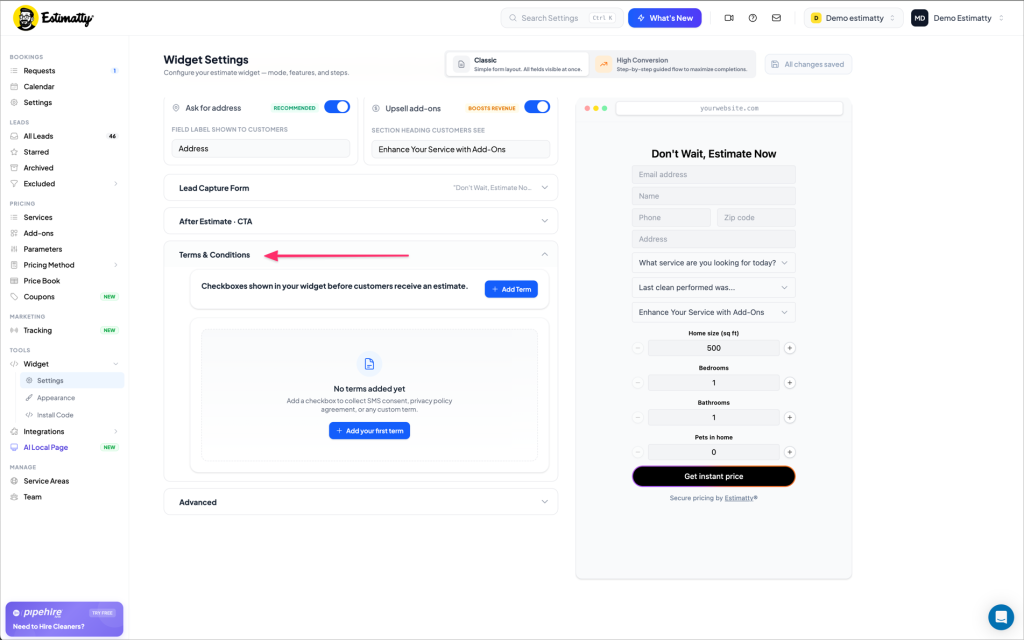
Terms & Conditions
Add consent checkboxes that customers must agree to before receiving their estimate. Common uses:
- SMS consent (required for compliant text messaging)
- Privacy policy agreement
- Custom terms specific to your business
Click + Add your first term to get started.
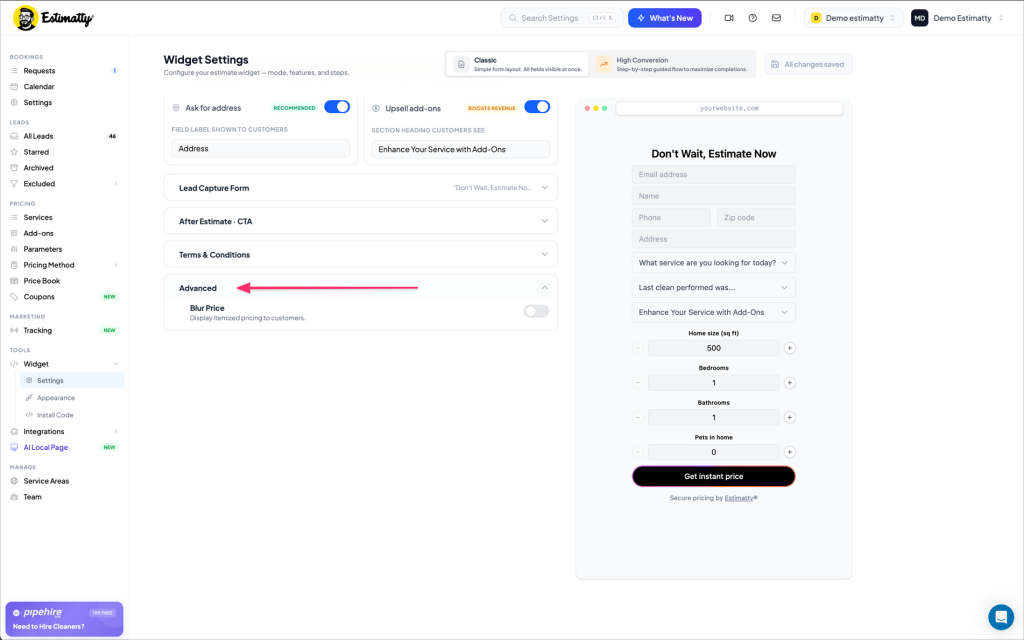
Advanced — Blur Price
The Blur Price toggle conceals the itemized pricing breakdown from customers. The total estimate is still shown, but line-item details are hidden.
Most companies leave this off. Turn it on if you prefer to walk through full pricing details during a follow-up call rather than display them upfront.
Step 3: Customize Your Widget’s Appearance
Navigate to Widget → Appearance in the left sidebar.
The Customize Look & Feel toggle is off by default.
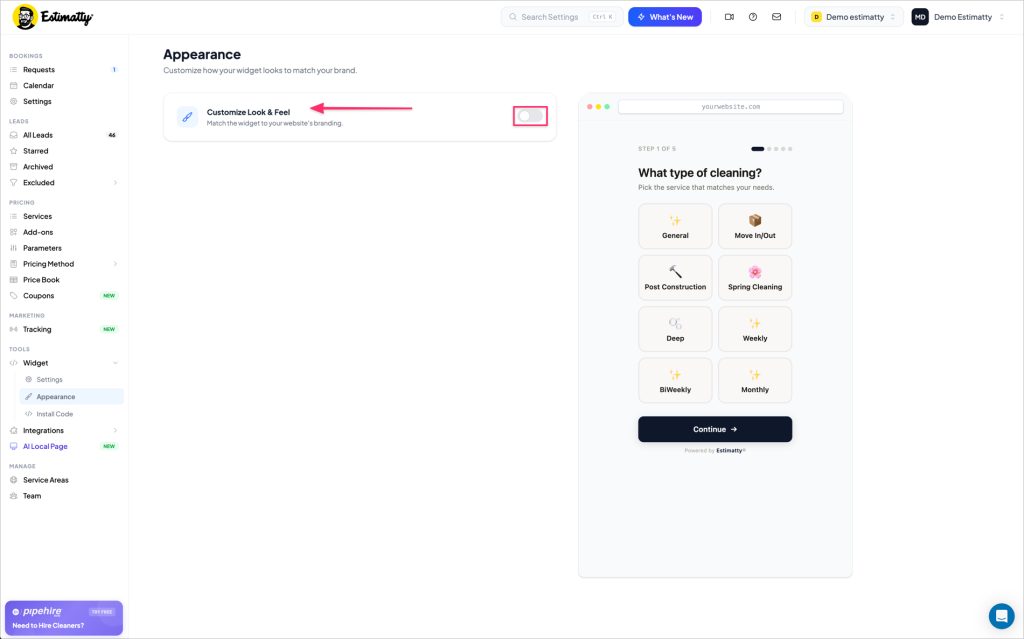
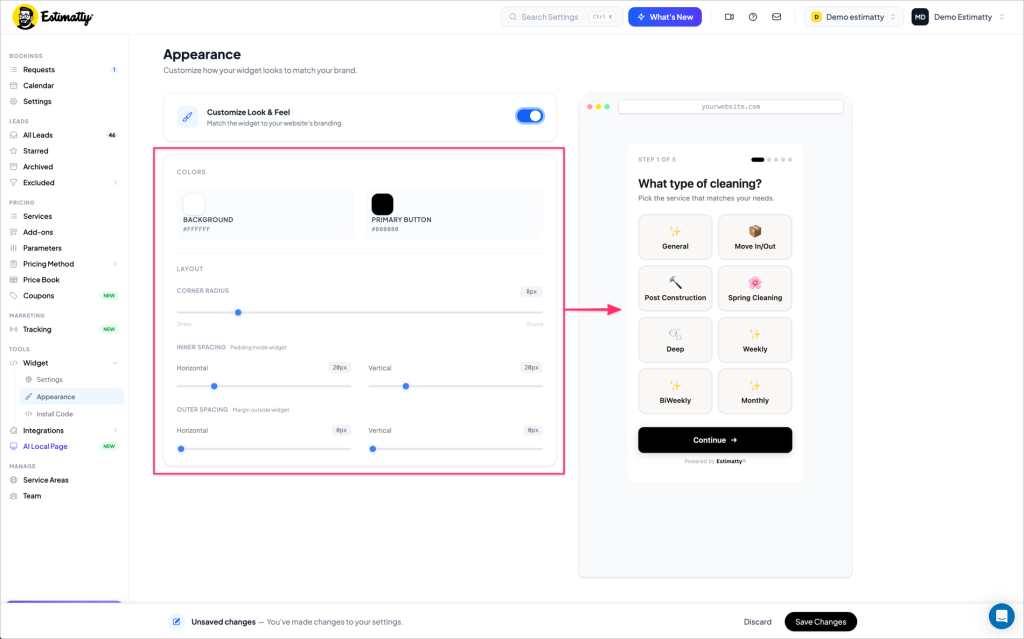
Toggle it on to reveal the full branding controls:
- Background color — default white (
#FFFFFF) - Primary button color — default black (
#000000) - Corner radius — from Sharp (0px) to fully Rounded
- Inner spacing — padding inside the widget (default 20px on both axes)
- Outer spacing — margin outside the widget (default 0px)
A live preview updates in real time on the right as you adjust.
Match your primary button color to your website’s main CTA button. This small detail makes the widget feel native to your site — not like a third-party embed.
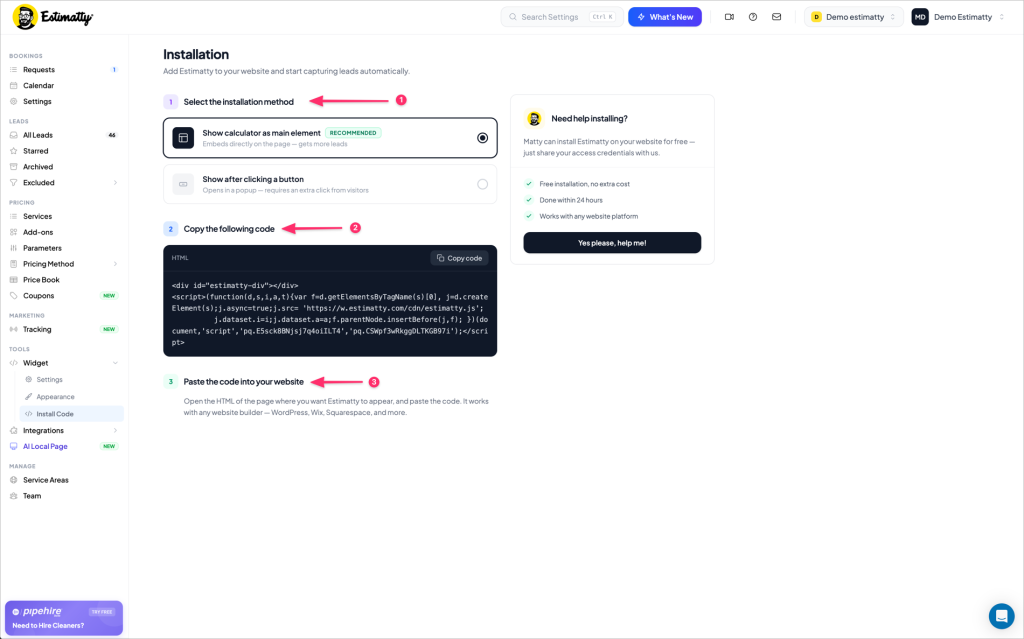
Step 4: Get Your Install Code
Navigate to Widget → Install Code in the left sidebar.
The installation page walks you through three steps:
1. Select the installation method
- Show calculator as main element (Recommended) — the widget loads directly on your page, fully visible and interactive without any click required. Best for your homepage hero section.
- Show after clicking a button — the widget opens as a pop-up modal when a visitor clicks your estimate button. Use this for secondary pages or if your homepage layout can’t accommodate a full inline embed.
2. Copy the code
Click Copy code to copy your unique snippet.
3. Paste the code into your website
Add it to any page where you want the widget to appear.
Step 5: Add the Code to Your Website
Once you have your snippet, here’s where to paste it on the most common platforms:
WordPress (Gutenberg Editor)
- Open the page where you want the widget (your homepage is the best starting point)
- Click the + icon to add a new block
- Search for and select Custom HTML
- Paste your Estimatty code into the block
- Drag the block to your desired position — ideally the hero section, above the fold
- Click Update or Publish
Squarespace
- Open the page editor
- Add a new block and select Code
- Set the display mode to HTML
- Paste your Estimatty code
- Position the block in your hero section
- Save
Wix
- In the editor, click + (Add Elements)
- Select Embed & HTML → HTML iFrame or Embed a Widget
- Paste your Estimatty code
- Resize and position in your hero section
- Publish
Custom HTML Site
Open your page’s HTML file (usually index.html for the homepage). Find your hero section and paste the Estimatty snippet directly inside it. Save and upload.
Strategic Placement Tip
The highest-converting placement is your homepage hero section — the first thing visitors see when they land on your site. When a homeowner lands and immediately sees a live estimator, the sales conversation starts before you’ve said a word.

Don’t Want to Touch the Code? We’ll Do It for You — Free.
Every Estimatty user gets free widget installation, done within 24 hours, on any website platform.
From the Install Code page, click “Yes, please, help me!” in the right panel, enter your website login credentials, and submit. You’ll receive email updates when we start and when it’s live.
Verify Your Installation
Once the widget is live:
- Visit your website and confirm the widget appears where you expected
- Run through the full estimate flow as a customer would — all the way to the price screen
- Confirm you receive the lead notification via email and/or SMS
- If you use a caching plugin, clear your cache first — the widget won’t appear until the cache refreshes
Questions? Reach out at support@estimatty.com.
You’re all set. Your widget is live, your pricing is working, and the next lead that hits your site gets a real answer — day or night.